Indexing Your Computerís Resources
As mentioned in the Key Concepts topic, Omea ReaderOmea Pro keeps track of the resources stored on your computer by means of an indexed database. This is compared to the engine in your car... itís a key piece of the vehicle, but you donít have to be a technical expert to use it.
Most of the time youWhen using Omea Reader, you will not need to concern yourself with the indexing process at all. It will happen in the background automatically as you work in Omea ReaderOmea Pro. As you receive, file, categorize, link, and communicate resources, and link resources, everything is tracked in real time and available to search any time. However, there are times when you do need to think about indexing, and to configure Omea so that it indexes all the content you want to search or browse with Omea (and excludes any that you donít).
This topic discusses initial indexing of resources to get started, and also covers how to do any ongoing modifications to the indexing configuration that you may need from time to time.
Initial Indexing
Until Omea ReaderOmea Pro creates its index of your computerís resources, you canít really benefit from any of its features. So before you begin working with it, you need to allow Omea ReaderOmea Pro to generate an initial resource index.
When you start Omea for the first time, it presents a special "wizard" that guides you through some steps in which you specify various options for creating the initial index. The options you can set with this wizard include:
- How much content to index initially. You can choose to index only resources dated within the last 2 weeks (Omea will index the rest in the background later as you work), or all of your resources at once.
- Which file system folders to include (or specifically exclude) from the index.
- Which Outlook folders to include (or exclude) from the index.
- Which bookmarked Web pages to download and index initially (and when the download should occur)
- Which instant messaging programsí histories to include in the index.
The Setup Wizard runs the first time you start Omea and helps you initially configure indexing (Omea Pro setup wizard is shown)
The indexing process is quite fast. However, the more content you have to index, the longer the process will take. If you have many thousands of e-mails and huge numbers of folders and files, you might want to reserve initial indexing for a time when you won't need to use your computer for a while, such as when you leave work for the day.
No initial index configuration is necessary. Omea Reader creates its resource index in the background as you access various online resources. Chances are you will not need to change any of the indexing configuration options available in this version of the product.
Modifying the Indexing Configuration
Once initial indexing has taken place, you can just work without having to think about it. You would, however, want to modify the indexing configuration in these situations:
- If you create new file system folders or Outlook (e-mail) folders that are not part of a folder tree that is already subject to indexing
- If you find you want to specifically exclude some folder(s) from indexing when that folder is contained in a folder tree that is subject to indexing
- If you add a new Outlook address book with contacts that you want to be indexed
- If you want to activate indexing for a resource type that is not currently activated for indexing. For example, maybe you didnít initially activate indexing for ICQ instant message histories because you didnít use ICQ, but then later you begin using it.
- If you want to activate indexing for a resource type that is not currently activated for indexing. For example, maybe you didnít initially activate indexing for RSS/Atom feeds because you didnít read any, but then later you wanted to begin reading some.
- If you add a supported Web browser whose Bookmarks you want to have indexed. For example, you may have begun with Internet Explorer bookmarks, but later decided to use a Mozilla browser and now you want to have its bookmarks indexed.
The Options Dialog
The Options Dialog (Tools | Options) provides access to all the various options for configuring the indexing process. It also provides other types of configuration options.
There are a number of option categories within the Options dialog. The following sections point out and briefly discuss those that pertain specifically to configuring indexing. The specific configuration options involved are covered in detail in the reference topic Reference: Options Dialog.
Indexing Folders
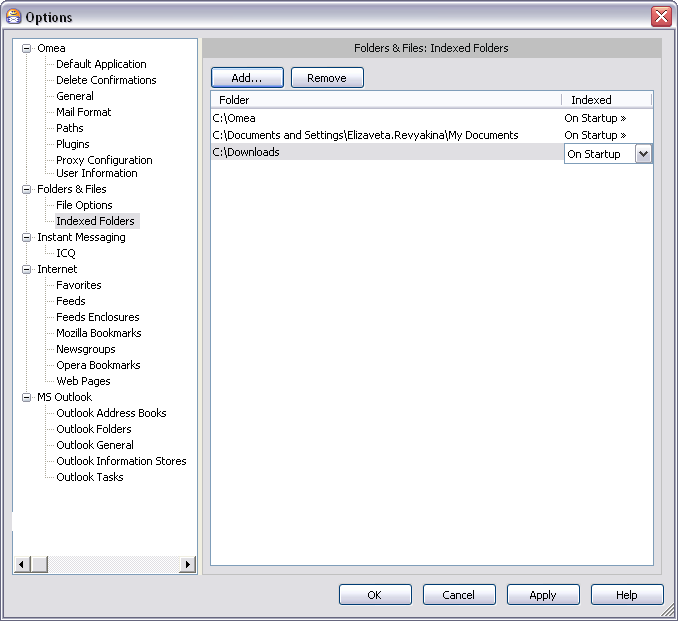
In order for Omea to be able to locate resources such as documents or files, the Windows folders that contain them need to be included in the index. You can see all the folders that Omea has indexed in the Indexed Folders pane.
To view the Indexed Folders pane:
- Select the Files tab in the main window.
- If the Indexed Folders pane is not visible in the Navigation panel (at the left of the main window), click the Indexed Folders button on the pane selector bar.
You initially specify the folders to index in the Setup Wizard (see above). There, you might, for example, select only your My Documents folder. Then, as you become more familiar with Omea, you realize that you want to be able to access file resources in folders that are not contained under My Documents. You would need to add such folders to the list of indexed folders in the Options dialog: Tools | Options: Files & Folders: Indexed Folders.
When you select Indexed Folders in the Options dialog, the right-hand panel shows a list of the folders that are currently subject to indexing.
IMPORTANT! A ll sub-folders of the listed folders are also indexed, unless a sub-folder has been explicitly marked by you as excluded from indexing.

Windows folders to be indexed by Omea are specified here
Adding More Folders to the Index
As mentioned in the preceding paragraph, you don't need to specifically add each and every folder you want to have indexed. You only need to specify highest-level folder in the Windows folder hierarchy that you want to include for indexing. All sub-folders under it will be indexed as well unless you single one or more out to be excluded (see Excluding specific sub-folders from the resource index below.
To add a folder for indexing:
- On the main menu choose Tools: Options: Files & Folders: Indexed Folders.
- In the Options dialog, click the Add button.
- In the Browse for Folder dialog, choose the top-level folder you want to include, or click the Make New Folder button to create a new top-level folder, and click OK. The chosen folder now appears in the list of folders in the Options dialog.
- Click on one of the Indexing Mode option buttons to specify how the contents of the new folder should be indexed (see "Folder indexing options" below.
- Click OK to accept the addition and close the Options dialog.
The new folder is added to the list of indexed folders, indexed according to the option you specified, and appears in the Indexed Folders pane when you select the Files tab in the main window.
Removing Folders from the Resource Index
If you find that some folder that is currently indexed no longer needs to be included in the indexing, you can remove it from the indexed folders list in the Options dialog. Doing so does not delete the folder (and any sub-folders) from your disk drive or storage device, and it is still possible to browse this folder within Omea. The contents of the folder excluded from indexing will no longer turn up in searches, and all links to resources in the folder tree will be removed.
To remove a folder from indexing:
- On the main menu choose Tools: Options: Files & Folders: Indexed Folders.
- In the Options dialog, select the folder(s) you want to remove. (Shift + Click to select multiple adjacent folders. Ctrl + Click to select multiple non-adjacent folders).
- Click the Remove button to remove the folder(s) from the list.
- Click OK to apply the removal and close the Options dialog.
Folder Indexing Options
When you add a folder to the list of indexed folders in the Options dialog, you can select one of 3 options that tell Omea how to index that folder:
- Immediate: Resources in the folder(s) now will be indexed immediately as they are stored in the folder(s).
- On startup: Resources in the folder(s) will be indexed when Omea starts up. New resources added during a session are not indexed until the next session.
- Never: Resources in the folder(s) will not be indexed.
Excluding Specific Sub-folders from the Resource Index
Itís important to remember that folders in the Indexed Folders list in the Options dialog are top-level folders. Whatever indexing option applies to that folder also applies to any sub-folders under it.
Suppose you have indexed your My Documents folder, but it contains a sub-folder named Private (which has other sub-folders under it) that you want to specifically exclude from indexing in Omea. Hereís how you would do it.
To exclude My Documents\Private from indexing:
- Add C:\My Documents\Private to the Indexed Folders list in the Options dialog.
- Select Never in the list in the Indexed column to the right of the folder.
- Click OK to accept the change and close the Options dialog.
The contents of the Private folder and its sub-folders will not be indexed and will not appear in Omea browse mechanisms or searches.
Please note that when you press the Delete (![]() ) on the toolbar, you delete resources physically from Omea and/or your local system but when you exclude the resources from indexing, they still remain on your PC but won't appear in search results.
) on the toolbar, you delete resources physically from Omea and/or your local system but when you exclude the resources from indexing, they still remain on your PC but won't appear in search results.
Indexing Outlook Folders
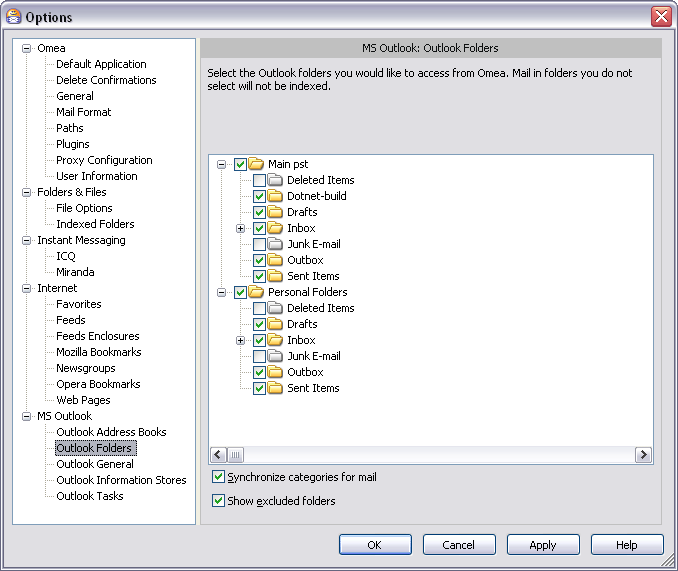
In order for Omea to be able to locate resources such as e-mail messages and e-mail attachments, the MS Outlook folders that contain them need to be included in the index. You can see the Outlook folders that Omea has indexed in the Outlook Folders pane.
To view the Outlook Folders pane:
- Select the E-mail tab in the main window.
- If the Outlook Folders pane is not visible in the Navigation panel (at the left of the main window), click the Outlook Folders button on the pane selector bar.
Initial Indexing via the Startup Wizard
You initially specify the Outlook folders to index in the Setup Wizard (see above). There, you might, for example, select only your Inbox folder. Then, as you become more familiar with Omea, you realize that you want to be able to access file resources in Outlook folders that are not contained under Inbox. You would need to add such folders to the list of indexed Outlook folders in the Options dialog: Tools | Options: MS Outlook: Outlook Folders.

MS Outlook folders to be indexed by Omea are specified here
Adding More Folders or Sub-folders for Indexing
Unlike Windows folders, Omea automatically detects all your MS Outlook e-mail folders and includes them in the index. To add another Outlook folder, simply add one in the Outlook Folders pane (left navigation panel) or in Outlook itself.
When Omea indexes the remote public folders and address books, it may take rather long and greatly depends on the amount of information these folders contain and your connection speed.
Excluding Specific Folders from Indexing
Because all Outlook folders are automatically included in the index, you need to explicitly exclude and Outlook folder(s) you do not want Omea to Index. For example, you might exclude the Outbox folder since messages donít usually stay there for long and therefore, searches will never yield any results from that folder.
To exclude an Outlook folder from indexing:
- Main menu: Tools | Options.
- Options dialog: MS Outlook: Outlook Folders.
- In the Outlook Folders list, expand the treeview as necessary and locate the folder you want excluded from the index.
- Clear the check box next to the folder name and click OK to save changes.
Indexing Instant Messaging (IM) Histories
Support for instant messaging in Omea is accomplished via plugins — small software modules that can be turned off if the feature they support is not used. (For more information, see plugins reference.
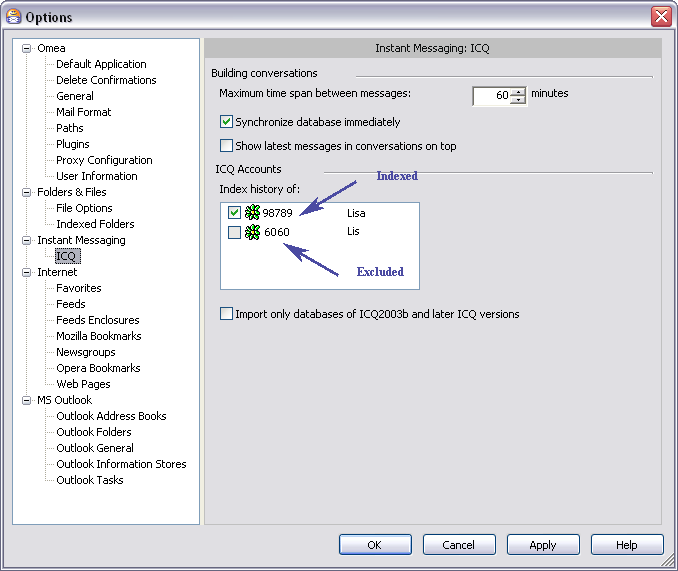
In order for Omea to be able to locate instant messages in searches, the message histories of supported instant messaging (IM) programs need to be included in the index. In order to include the message history of an IM program, the supporting plugin must be installed and activated in the Options dialog. Once this is done, Omea detects all accounts for each installed and activated IM program and displays these in the options for each IM program:

IM options showing accounts detected for ICQ
Adding an IM History to the Resource Index
You only need to do this if you add more accounts to a supported instant messaging program, or if you already have multiple accounts on any IM platform... if you have more than one ICQ account, for example.
The figure above shows 2 ICQ accounts have been detected by Omea. The check box for the first account is checked, meaning the message history for that account is included in the Omea index. The second account is not checked, meaning its history is not indexed. If you wanted to index the history of that account, check the check box.
Removing an IM History to the Resource Index
If you want Omea to stop indexing the message history of an IM account, clear the check box next to the account details.
The index is cleared of all messages and contacts for the account, and searches will no longer yield any results from it. The IM account is not removed... it just becomes "invisible" to Omea.
Indexing Other Resource Types
Indexing of Omea Reader Resource Types
The indexing of other kinds of resources the resource types supported in Omea Reader is automatically handled by Omea ReaderOmea Pro and does not require any configuration on your part.
Web Pages
Web pages are automatically indexed when they are downloaded. You can control when Web pages download in the Options dialog: Internet: Web Pages.
Newsgroups
Articles are automatically indexed when downloaded. You can set downloading options in the Options dialog: Internet: Newsgroups.
Feeds
Indexing occurs automatically when feeds are downloaded. You can set downloading options in the Options dialog: Internet: Feeds.
