New/Edit Contact DialogEdit Contact Details Dialog
You can access this dialog by double-clicking on a Contact record in the listing of Contacts. To do so, navigate to the Contacts tab and select any contact in the Items List. The contact details will appear in the Item Viewer.
To access this dialog, from the File menu, select New | Contact.
If you double click on a Contact record in the listing of Contacts (navigate to the Contacts tab and select any contact in the Items List), you will be able to edit the Contact details by clicking the Edit button in the Item Viewer.
This dialog is used when creating a new Contact or modifying the details of an existing Contact. The only difference is in the title of the dialog.
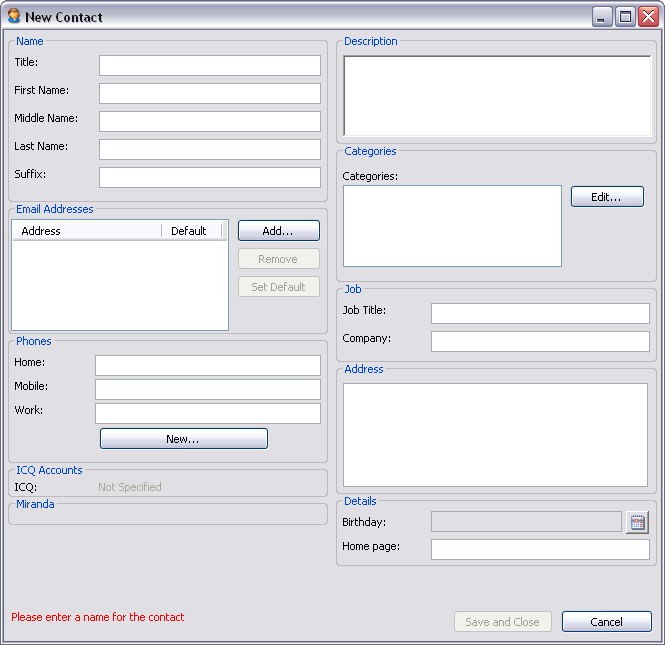
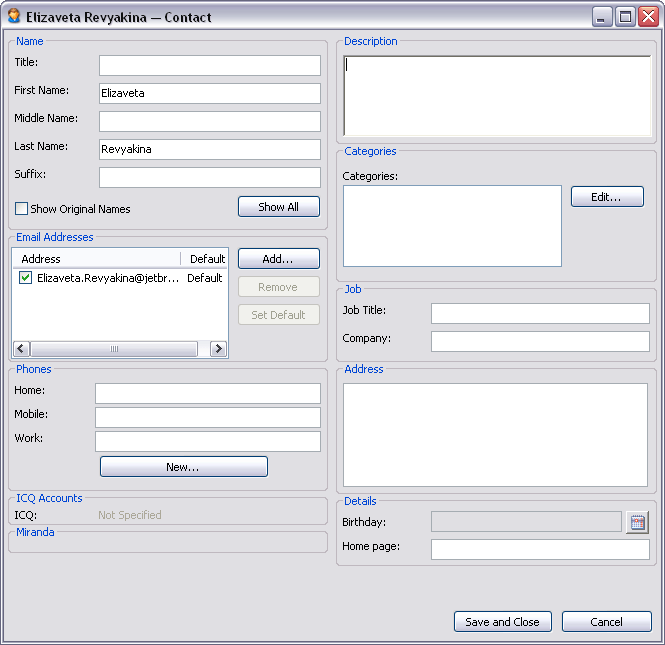
The New Contact dialog and Edit Contact Details dialog
Name
This group box enables you to specify the name of the Contact. Note that you must fill in at least one of the fields in this group in order to be able to save a new Contact record.
Title
A title such as "Ms.", "Dr.", "Hon.", etc. (optional)
First Name
Person�s first name (sometimes called "given name"). (Normally specified)
Middle Name
Person�s middle name. (Optional)
Last Name
Person�s last name (sometimes called "family name"). (Normally specified)
Suffix
A suffix such as "Jr.", "MP", "MD", etc. (optional)
Show All (button) (in Edit Contact dialog if the Contact has several available names)
Pressing this button, opens a dialog where you can see all names which are available for the user.
Show Original Names
In some cases you may receive e-mails, or newsgroup articles or feed posts where your contact details are changed, i.e. the user which sent you an e-mail or answered your newsgroup post used a name different from the one in your contact details or in the contact details of the Contact the information about which you already have in Omea. If you check the "Show Original Names" option, messages which you receive will display those contact details which other users have mentioned (but not those in contact details).
Email Addresses
This group enables you to specify one or more e-mail addresses for the Contact and designate an address as the default e-mail address.
Add (button)
Adds a new e-mail address to the list of addresses (at left). You can type in the address in-place in the list.
Remove (button)
Removes the selected addresses from the list of e-mail addresses. Button is disabled if no address is selected, or if the list is empty.
Set Default (button)
Sets the selected e-mail address as the default address, which is used for new e-mail messages to the Contact. Button is disabled if no address is selected, or if the list is empty.
Phones
This group enables you to specify phone numbers for the Contact, and to add or delete phone number fields. By default, there are 3 phone number fields: Home, Mobile, and Work but you can add other phone numbers if you wish.
Creating a New Phone Number Field
To create a new phone number field (Fax, for example), click the New button. A new field appears in the group of Phones, and the dialog-box expands vertically to accommodate this new field. You can then type in a name for the new phone field and click the Enter button for the contact to appear in the list of contacts and go to other fields editing.
Removing a Phone Number Field
You can remove an existing phone field by right-clicking its label and choosing Delete. If the field contains a phone number, it is deleted along with the field.
You cannot edit the name of a phone number field. Instead, you should create a new one with the name you want, copy the phone number to the new field, and finally remove the old field.
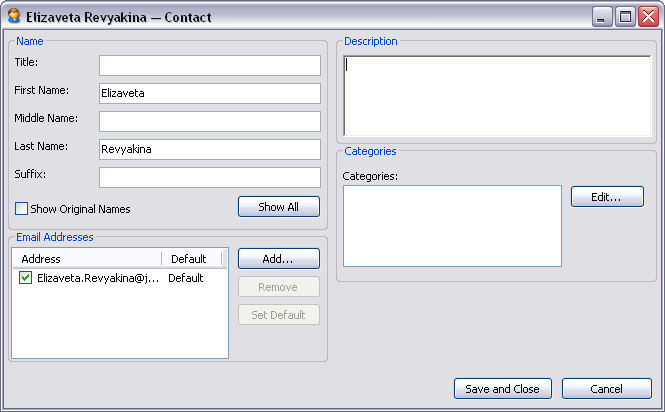
Description
You can use this field to enter any descriptive text about the Contact. This text appears in the detail view for the Contact when you select it in the list of Contacts in the Item Viewer.
Categories
This group contains information about the Category or Categories which you have assigned for the Contact.
Edit…
Pressing the Edit… button calls the Assign Categories dialog. Select one or more Categories by checking the box in the list of Categories or create a new Category and assign this Category for the Contact. The Category which you assign for the Contact will be a “label” which you “adhere” to the Contact.
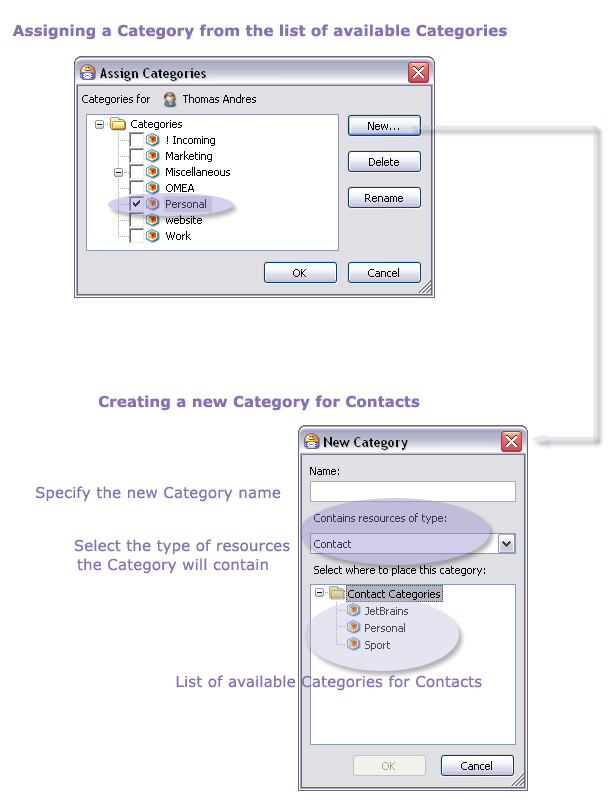
Assigning Categories for Contact and creating new Categories
You can create a nested system of Categories for your Contacts if it's necessary. For example, Work, Home, Research, Sport and so on. These Categories of Contact will help you to better manage your interaction with other people because you can access all of them in one place (Views and Categories pane) all at once.
For more information about Categories, see Organizing using Categories.
Job
This group contains information about the Contact�s work.
Title
This is the person�s job title. Optional.
Company
The name of the company where the Contact works. Optional.
Address
This is the mailing (postal) address for the Contact.
Details
This group provides fields for miscellaneous information about the Contact.
Birthday
This is the person�s birthday. You cannot edit this field directly. Click the calendar icon to the right of the field and select the date from the pop-up calendar dialog. This field is optional.
Home Page
The address (URL) of the Contact�s home page on the web. Since links
will be created to this URL, be sure to enter it correctly. For a URL
like http://www.theirsite.com you can omit http://
and just enter www.theirsite.com. Links will work either
way.
ICQ Accounts
This group shows the ICQ account number(s) for this Contact. Please note that you cannot edit this information. ICQ accounts are automatically detected and added to the Contact record after it is saved for the first time.
See also: