Working with Local Files in Omea ProOmea Reader
Omea Reader does not support working with files, so you can only work with the newsgroups articles attachments. You can:
- open attachments of the newsgroups posts (the file types are supported by Omea Reader) and see them in the Item Viewer,
- save the attachments to file,
- apply multiple organizational features to the attachments (assign Categories, add Links, add attachments to Workspaces, edit Custom Properties, annotate attachments and set Flags).
Saving Attachments to Your Local System
To save the attachment of the newsgroup article:
Select the newsgroup in the Newsgroups pane and navigate to the desired news article containing attachment(s).
Navigate to the Links and Actions panel News Attachment group.
Right-click the attachment link and select Save As…
In the window that opens, select the folder where you want to save your file and click Save.
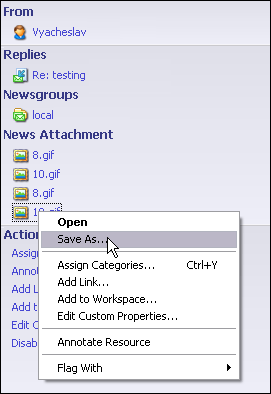
Attachments shortcut menu
Applying Organizational Features to Attachments
Marking Attachments with Flags
You can mark the news posts attachments with Flags to remember to follow up on some information which the attachment contains. To do so:
- Select the newsgroup in the Newsgroups pane and navigate to the desired news article containing attachments.
- Navigate to the Links and Actions panel News Attachment group.
- Right-click the attachment link and select Flag With.
- Select the Flag type.
The attachment with Flag appears in the Flagged View of All Resources tab.
Annotating Attachments
To add some meaningful note to the newsgroup post attachment:
- Select the newsgroup in the Newsgroups pane and navigate to the desired news article containing attachment(s).
- Navigate to Links and Actions panel
and click the link with attachment name.
The Attachment opens in the Item Viewer. - Navigate to Links and Actions panel and click Annotate Resource.
- Type the text in the Edit Annotation
window.
Annotated attachment appears in the Annotated View of All Resources tab.
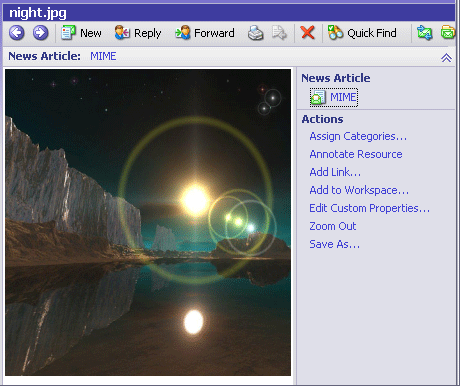
Previewing attachment (graphical file) in the Item Viewer
Linking Attachments with Other Resources
You can link the newsgroups attachments with other resources by creating relationships between the attachments and different types of resources:
- Select the newsgroup in the Newsgroups pane and navigate to the desired news article containing attachments.
- Navigate to Links and Actions panel,
right-click the attachment link and select Add Link…
The attachment appears in the Resource Clipboard window. - Drag the attachment from from the Resource
Clipboard and drop it to other resource.
In the window that opens, type the new custom link type name or select the existing type of the custom link from the list.
When you navigate to the resource which is linked with the attachment, you can see the custom link with the name you have specified in Links and Actions panel.
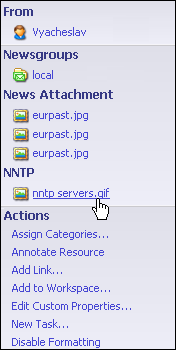
Custom link (NNTP) in the Links and Actions panel
Associating Attachments with Workspaces
To add the attachments to different Workspaces to access them in some place isolated from all other resources:
- Select the newsgroup in the Newsgroups pane and navigate to the desired news article containing attachment(s).
- Navigate to Links and Actions panel, right-click the attachment link and click Add to Workspace.
- In the window that opens, select the Workspace with
which you want to associate the attachment and click OK.
The attachment appears in Other View of All Resources tab of the Workspace with which you have associated the attachment.
Changing the Scale of Graphical Files (Zooming in and Zooming out)
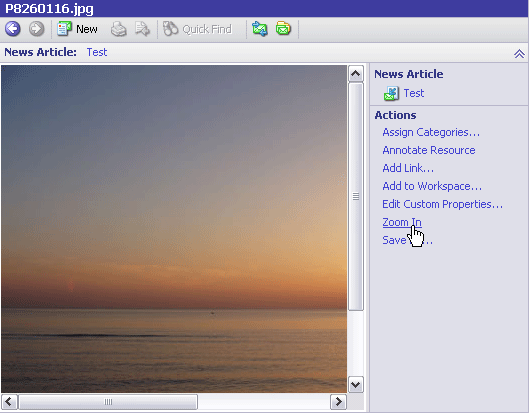
You can change the zoom of graphical files (of the supported types) in Omea Reader. If the file size does not match the size of the Item Viewer, Zoom In and Zoom Out links become available in the Links and Actions panel. Click Zoom In to enlarge the image and Zoom Out to make the image smaller.
With Omea Pro you can work with your local files the way you got used to it in Windows® because it has a built-in file browser that allows to access and manage locally stored files in the folders you tell Omea Pro to index. And now you still need Windows® filing system to only store your data.
Omea Pro's built-in file system browser supports the following types of document files:
- Microsoft Word® (.doc)
- Adobe PDF
- HTML/XHTML
- Plain text
The supported image files are:
- Bitmaps (BMP)
- GIF
- JPG/JPEG
- PNG
- Windows Icons (ICO)
Indexing File Folders
You have already come across setting indexing options in Omea Pro's startup wizard but y ou can decide which file system folders you want to make available in Omea Pro and explicitly exclude any folder (a temp folder, for example) any time later. Once the files are indexed, you can use Omea Pro's search capabilities to find the necessary information.
Main Operations for Working with Files
Using Omea's built-in file browser you can:
- Open and view files' and file folders' content
- Locate the files and folders on disk
- Send files by e-mail
- Rename the files and file folders
- Move and copy files and folders
- Delete files and folders
- Print files' content
Opening and Viewing Files
Opening and viewing files in Omea Pro is not different from doing it in Windows® Explorer, but compared with Windows® Explorer, Omea Pro allows you to see the contents of the supported file types in its Item Viewer, so you don't need to switch programs.
To view the files, navigate to the desired folder in the Indexed Folders pane, select the file or folder in the Items List and see the file contents in the Item Viewer.
Locating Files on Disk
Omea Pro can launch Windows® Explorer so that you can see the files and folders in Windows file system structure. Right-click the file or the folder and click Locate on Disk on the shortcut menu. The Explorer window opens showing the file(s) and/or the file folder(s).
Renaming Files and File Folders
To change the name of the file or folder:
- Select the folder in the Indexed Folders pane (and navigate to the Items List if necessary).
-
Do one of the following:
- Right-click the file or folder and from the shortcut menu, select Rename
- Navigate to Links and Actions panel, right-click the file or folder name link and select Rename
- Type the new file or folder name and press Enter or click in any place of Omea Pro's window.
Copying and Moving Files and File Folders
Copying, cutting and pasting files and file folders in Omea Pro is the same as in Windows Explorer®. Omea Pro also supports dragging and dropping the file folders and files from one location to another.
To move the folder:
Select the folder you want to move in the Indexed Folders pane.
Press and hold down the mouse button while moving the folder to the new location.
The pointer changes its appearance as in figure below.Release the mouse button.
The folder and its contents will be moved to the new location.
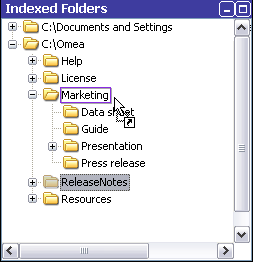
Moving "ReleaseNotes" folder to 'Marketing" folder
To move the file from one folder to another, select it in the Items List and drop to a different folder.
To copy the item instead of moving it, press and hold down Ctrl while dragging.
Creating New Folders
You can create new subfolders in the folders which are already included in indexing in Omea Pro. To do so:
- Right-click the folder in the Indexed Folders pane or in the Item List, and select New Folder on the shortcut menu.
- Type the folder name and press Enter or click in any place of the Indexed Folders pane or the Items List.
Sending Files by E-mail
To share some of your resources, you can e-mail your files to other people. To do so:
- Select the folder in the Indexed Folders pane and navigate to the desired file(s). To send more than one file, hold Ctrl when selecting the files.
- Right-click the file(s) and select Send by
Mail on the shortcut menu.
MS Outlook message form will open, and the file(s) will be inserted in your message as attachment(s). - Type the recipients name, message subject and text and click Send.
Printing Files' Content
With Omea Pro you can print the contents of the files in just one mouse click.
- Select the folder which contains the file you want to print in the Indexed Folders pane.
- Navigate to the file in the Items List and select the file.
- Click the Print icon
 on the Items
List toolbar.
on the Items
List toolbar. - Set printing preferences and click Print.
Your file will be printed .
Organizing Local Files and Folders
Organizing using Categories
You can organize your files by assigning Categories to them. Say, you can create a Category named Files for the newsgroup posts, assign this Category for the attachments to the newsgroups posts which you consider useful and interesting, and access these newsgroups posts attachments there.
Associating files and folders with Workspaces
You control which folders are accessible to Omea Pro, globally and per Workspace. You can change these settings any time to include new folders outside the currently accessible paths.
Applying Custom Properties to the files
After you have specified the custom properties types, you can apply them to different file types available to you through Omea Pro.
- Select the file in the Item Viewer, and select Edit Custom Properties… from the Links and Actions panel.
- In the window that opens, check the type of the custom property you want to apply to the file.
- The new property will appear in Links and Actions pane for this file and in the Item List Viewer. If the column with the name of the custom property is not visible, right-click the Items List columns and select the custom property name in the Configure Columns dialog.
Creating Clippings from the file's content
You may find the Clippings content a useful feature for working with local files because it will allow you to select the meaningful pieces from the document and refer to them some time later. You can create the Clippings from the content of some text files saved in Word, PDF, HTML and XHTML format and text format. To create a Clipping, select the text you want to clip and click Create Clipping from Selection on the Items List Toolbar.
Adding Flags and Annotating files
You can add flags and add some notes to the files and see these in All Resources tab in Flagged and Annotated View respectively.
Changing the Scale of Graphical Files (Zooming in and Zooming out)
You can change the zoom of the supported types of graphical files in Omea Pro. If the file size does not match the size of the Item Viewer, Zoom In and Zoom Out links become available in the Links and Actions panel. Click Zoom In to enlarge the image and Zoom Out to make the image smaller.
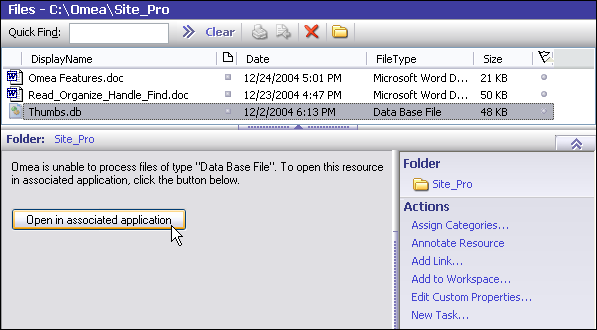
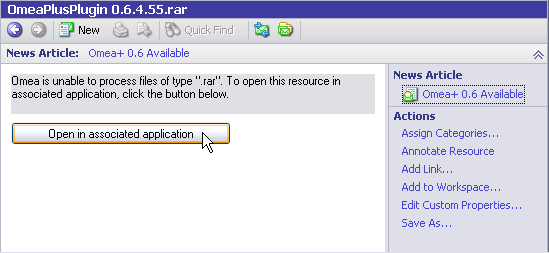
Opening Associated Applications
If the file type you are trying to open is not supported by Omea ProOmea Reader, click the Open Associated Application and select the program which can process the file type.
Deleting Files and File Folders
If you no longer need a file or folder, you
can delete it using Omea Pro. Just select the file or folder to delete
and click ![]() button on the Items List Toolbar
or select Delete on the shortcut menu.
button on the Items List Toolbar
or select Delete on the shortcut menu.
If you delete the file or folders from within Omea Pro, it will be deleted into the Recycle Bin or permanently from your system (depending on your settings), but if you don't want to access the contents of the file or folder in Omea Pro, you need to exclude it from indexing.
Managing Indexing Options of the File Folders
You can change the indexing options or add or exclude the file folders from indexing at any time. For more information, refer to the description of Indexed Folders dialog.
To change the folders indexing settings:
-
Do one of the following:
Right-click in any place of the Indexed Folders pane and select File Folders… on the shortcut menu
Right-click the desired folder on the Items List and select File Folders… on the shortcut menu
Select the folder in the Items List Viewer, and click File Folders Options button on the Items List Toolbar.
In the Options dialog which opens and shows Omea Pro's indexing options, select different indexing option.
To exclude the folders from indexing and add folders into indexing:
-
Do one of the following:
Right-click in any place of the Indexed Folders pane and select File Folders… on the shortcut menu
Right-click the desired folder on the Items List and select File Folders… on the shortcut menu
In the Options dialog which opens and shows the existing indexing options in Omea Pro, click Add to add more folders into indexing or select the folder which you want to exclude from indexing and click Remove.